
Self Extracting Executable in C# with 7ZIP demo and tutorial.
Project Files: Download
Recently, I found myself in a situation where I needed to package the .NET framework with my installer. The goal was to install it, if the machine did not have the correct version.
But, I saw one potential problem. For example, what if the client has an older machine? A machine that runs on a .NET framework lower than the minimum required one for my installer.
How do you install the .NET framework and then run your installer as well?
I found the answer in creating a low level C++ application to help with the procedure. In other words, this small app will check the .NET framework installed. Consequently, if the minimum version is not met, it would launch the .NET installer. However, if the client has met all criteria it will simply launch the .exe installer.
So, now I have set up my solution. But, the only thing I am missing is a self extracting executable. An executable that once run, it will extract the .NET framework installer, my C++ app and my .exe installer. But most importantly, it should run the C++ application first.
Self Extracting Executable in C#
This is the result of the application I’ve created to accompany this blog post.

It is compressing a list of files in a single .exe file.
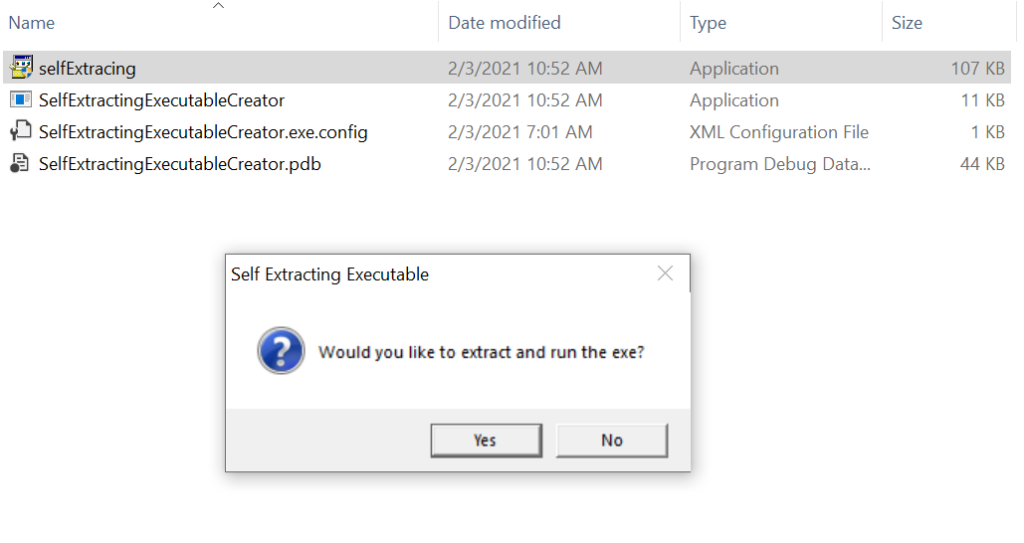
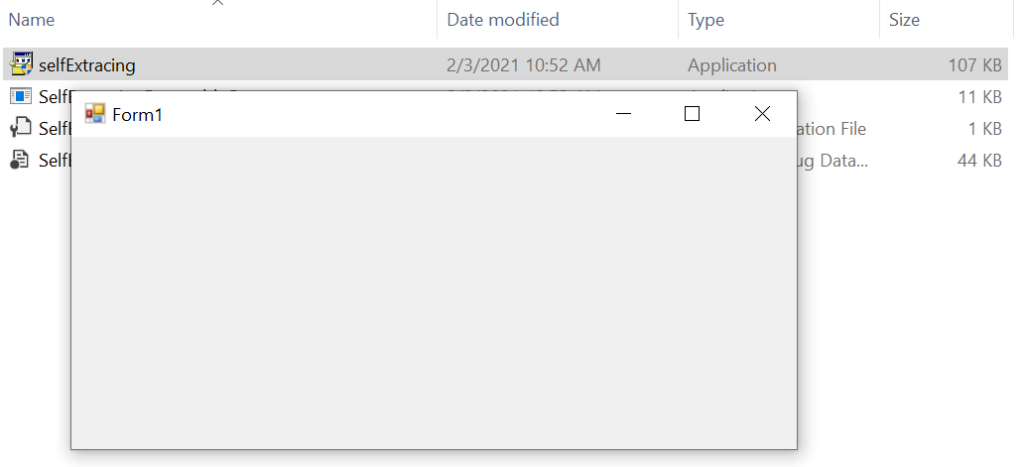
When executed, it will prompt the user if they want to extract and run the exe. If the answer is yes, then we are extracting then running the application.
7Zip References
This project relies on the 7Zip file archiver.
Let’s see how we can use it.
Implementation of the solution
The solution contains two projects. One is the SelfExtractingExecutable and the other is SelfExtractingExecutableCreator.
The first project is the application that we want to extract and run. The second, is the self extracting executable creator.
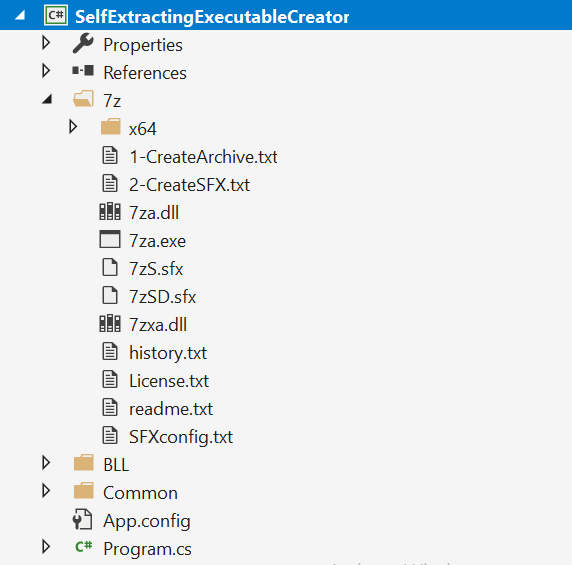
In order to create a self extracting executable, first we need the path to the 7za.exe and the 7zSD.sfx. They are both located in our 7z folder included in our project.
7za.exe allows you to execute commands using the system internal. We will run the commands using the Process class. If you would like to see how to execute command prompt commands, you can check my tutorial here.
Since we are all setup let’s check the source code.
Source Code
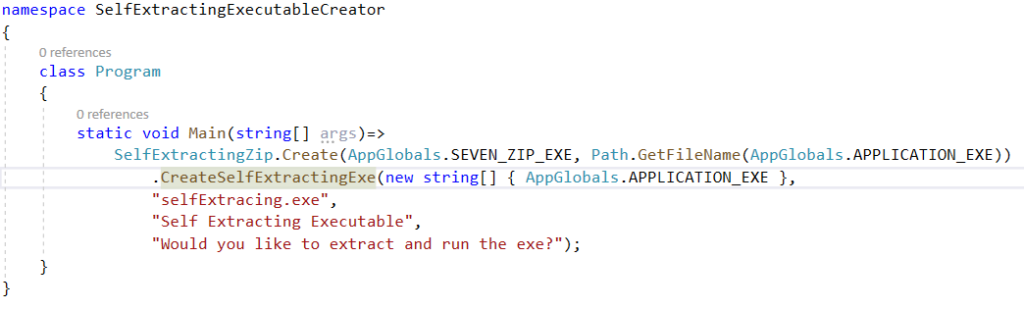
On the image above we can see the usage of SelfExtractingZip class.
In order to create an instance of it, we must supply two parameters. The first one is the path to the 7za.exe program. The second is the path of the application we want to run.
Then we are ready to call the CreateExtractingExe method. This method accepts a list of files to be compressed as it’s first parameter. However, we also need to provide the name of the output file. In addition, we can also set up the window message and title to the window that precedes the extraction.
Let’s inspect this procedure next.

First, we run a 7Zip command to compress the files and write the output to the COMPRESSED_ARCHIVE file. Next we create the SFXArchive that is responsible for the pop up window the user will see before extraction. But, also for running the provided executable path _runExecutable.
After that, all we have to do is combine the compressed.7z and SFXconfig.txt files into an executable. Next we will inspect the individual command prompt commands.
7Zip Command to compress files
$"a \"{outputFile}\" \"{file_1}\" \"{file_2}\""This command compresses file_1 and file_2 into the file specified via the outputFile parameter. Please note we have to escape the double quotes.
SFX Module For 7-Zip
The following code generates SFX module for 7-zip that we are using to produce a self extracting archive. It can extract invisibly or not. It will not overwrite existing files though. You can also specify the output extract directory and optionally allow a program to be run after the extract.
";!@Install@!UTF-8! Title=\"{Title}\" BeginPrompt=\"{Message}\" Progress=\"{No}\" RunProgram=\"{program_file}\";!@InstallEnd@!"This is pretty much a self explanatory code. First, we specify the title and the message of the prompt before the extracting procedure. Additionally, we can show progress or not. In addition, as an optional parameter we can specify the executable name to be run after extraction.
Combine files into a executable
Having the compressed archive and the SFX file, all there is to do is to combine them into an executable.
We can do that by using the copy command.
copy /b \"{7zSD.sfx}\" + \"{SFXConfix.txt}\" + \"{CompressedArchive}\" \"{OutputExecutable}\"The copy command accepts a /b parameter. This allows us to combine multiple files into a binary file. The only thing it needs explanation is the 7zSD.sfx file. But, don’t worry. This file is actually provided in our project under the 7z directory.
And there you have it, we are all done.
Final Thoughts
This particular procedure can be very useful in a scenario as described in the introduction. Especially when there are pre-installer requirements that needs to be fulfilled before running the installer.